The Fusing Unit is the final stage of the Konica Minolta bizhub electrophotographic printing process. Up to this point, the toner image has only been held to the paper by electrostatic attraction after being transferred from the Intermediate Transfer Belt (ITB) by the Secondary Transfer Roller. The image is still loose and can easily be smudged or wiped away.
The purpose of the Fusing Unit is to apply precisely controlled heat and pressure to permanently bond the toner particles into the paper fibers. This process transforms the loose toner image into a durable, high-quality print that is resistant to smearing and abrasion.
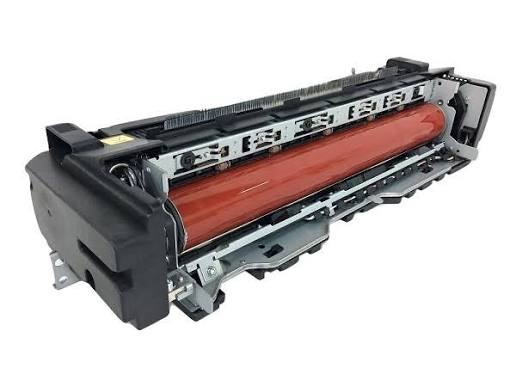
Modern Konica Minolta bizhub machines use an intelligent fusing system that continuously adjusts temperature, pressure, and paper speed according to:
- Paper type
- Paper thickness
- Print coverage
- Environmental conditions
- Printing speed
- Duplex operation
A properly functioning Fusing Unit provides:
- Permanent toner adhesion
- Sharp text and graphics
- Smooth color gradients
- Uniform gloss
- Reliable duplex printing
- Fast warm-up and energy efficiency
When the fusing system develops faults, technicians may observe:
- Toner rubbing off the page
- Wrinkled paper
- Paper jams in the fuser
- Offset toner
- Gloss variations
- Smudged prints
- Fuser error codes
- Abnormal noise
Understanding how the Konica Minolta bizhub Fusing Unit works is essential for diagnosing print-quality and paper transport problems.
Where the Fusing Unit Fits in the Imaging Process
The complete electrophotographic process is:
- Primary Charge Roller charges the OPC drum.
- Laser Scanner Unit writes the latent image.
- Developer Unit applies toner to the drum.
- Primary Transfer Rollers transfer toner to the Intermediate Transfer Belt.
- Secondary Transfer Roller transfers the image to the paper.
- The Fusing Unit permanently bonds the toner to the paper using heat and pressure.
- Finished paper exits to the output tray or duplex path.
The Fusing Unit performs the final imaging step before the page leaves the machine.
What Is the Fusing Unit?
The Fusing Unit is a precision assembly consisting of heated and pressure components that permanently fix toner onto paper.
Unlike earlier imaging stages that rely mainly on electrostatic forces, the fuser uses thermal energy and mechanical pressure.
Its primary functions are to:
- Melt toner particles.
- Press molten toner into the paper fibers.
- Produce durable images.
- Maintain consistent print quality across different paper types.
Main Components of the Fusing Unit
| Component | Function |
|---|---|
| Upper Fusing Roller or Fusing Belt | Supplies heat to melt toner |
| Pressure Roller | Applies pressure to bond toner into the paper |
| Heater Lamp or Induction Heater* | Generates heat for the fusing element |
| Thermistor | Monitors fusing temperature |
| Thermal Fuse (Thermostat) | Protects against overheating |
| Separation Claws (Picker Fingers) | Prevent paper from wrapping around the hot roller or belt |
| Exit Rollers | Feed the paper out of the fuser |
| Fusing Drive Gears | Rotate the fusing components |
*The heating method varies by bizhub model. Some models use quartz heater lamps, while others use induction heating technology.
How Toner Is Fixed to Paper
Konica Minolta toner consists of:
- Thermoplastic resin
- Pigments
- Wax additives
- Charge-control materials
During image transfer, toner rests on the paper surface.
The toner is not yet bonded.
Inside the Fusing Unit:
- Heat softens and melts the toner resin.
- Pressure presses the molten toner into the paper fibers.
- As the toner cools, it solidifies and permanently adheres to the paper.
Step 1: Paper Enters the Fusing Unit
After secondary transfer:
- The paper carries the loose toner image.
- Registration remains critical.
- The paper enters the fuser at a controlled speed.
Proper timing prevents image distortion.
Step 2: The Fusing Roller Applies Heat
The heated upper roller or fusing belt raises the toner to its melting temperature.
The toner resin softens and flows.
Only the toner melts—the paper itself remains intact.
The machine carefully regulates temperature to ensure:
- Complete toner fusion
- Minimal paper damage
- Consistent gloss
Step 3: The Pressure Roller Applies Force
As the paper passes through the nip between the heated element and the pressure roller:
- Even pressure is applied across the page.
- Molten toner is pressed into the paper fibers.
- The toner forms a durable bond as it cools.
Uniform pressure is essential for consistent image quality.
Step 4: Paper Separation
After fusing:
The paper naturally separates from the hot roller or belt.
If necessary, separation claws assist by preventing the paper from wrapping around the heated surface.
Poor separation may result in paper jams or damaged prints.
Step 5: Paper Exits the Machine
The exit rollers transport the finished page toward:
- Output tray
- Finisher
- Duplex path
The toner is now permanently fused and can withstand normal handling.
Temperature Control
The Fusing Unit operates within a carefully controlled temperature range.
The Thermistor continuously measures the surface temperature of the heated element.
The Engine Control Board adjusts heater power to maintain the target temperature for the selected media.
Temperature control prevents:
- Under-fusing
- Over-fusing
- Toner offset
- Paper damage
Safety Protection
To prevent overheating, the Fusing Unit includes safety devices such as:
Thermistor
Continuously monitors operating temperature.
Thermal Fuse (Thermostat)
Interrupts heater operation if excessive temperature is detected.
Engine Monitoring
The machine monitors warm-up time and operating temperature.
Abnormal conditions may generate fuser-related error codes and stop printing to protect the machine.
Adapting to Different Paper Types
Different media require different fusing conditions.
Examples include:
- Plain paper
- Thick paper
- Glossy media
- Envelopes
- Labels
The selected paper type influences:
- Fusing temperature
- Paper speed
- Pressure characteristics
- Cooling time
Using the correct media setting is essential for reliable toner adhesion.
Common Fusing Problems
1. Toner Rubs Off the Page
Appearance
The printed image can be smeared or wiped away.
Possible Causes
- Insufficient fusing temperature
- Incorrect paper settings
- Heater failure
- Thermistor problems
2. Toner Offset
Appearance
Toner transfers from one sheet or the hot roller to another page.
Possible Causes
- Excessive temperature
- Damaged fusing roller
- Worn release coating
3. Wrinkled Paper
Possible Causes
- Uneven pressure
- Damaged pressure roller
- Incorrect media settings
- Moist paper
4. Gloss Variation
Appearance
Some areas appear shinier than others.
Possible Causes
- Uneven heating
- Pressure roller wear
- Temperature instability
5. Paper Jams in the Fuser
Possible Causes
- Worn separation claws
- Damaged rollers
- Foreign objects
- Exit sensor problems
Fusing Problems vs. Transfer Problems
| Print Symptom | Fusing Unit | Transfer System |
|---|---|---|
| Toner rubs off | ✓ | |
| Toner left on ITB | ✓ | |
| Light image | ✓ | |
| Smudging after printing | ✓ | |
| Background toner | ✓ | |
| Wrinkled paper | ✓ | |
| Offset toner | ✓ |
Recognizing when the defect occurs helps isolate the correct subsystem.
Diagnostic Procedure for Technicians
Step 1: Check Toner Adhesion
Lightly rub the printed image after it exits the machine.
If toner transfers to your finger or cloth:
- Suspect a fusing problem.
- Verify media settings before replacing components.
Step 2: Inspect the Fusing Rollers
Look for:
- Scratches
- Worn release coating
- Toner buildup
- Surface damage
- Flat spots
Damaged rollers often produce repeating defects.
Step 3: Inspect the Pressure Roller
Check for:
- Uneven wear
- Hardening
- Surface contamination
- Mechanical damage
Uneven pressure causes poor toner bonding.
Step 4: Verify Temperature Control
Using the procedures in the service manual:
Check:
- Thermistor condition
- Heater operation
- Thermal fuse continuity
- Electrical connectors
Because the fuser operates at high temperatures and contains hazardous voltages, follow all manufacturer safety procedures during inspection.
Step 5: Verify Paper Settings
Ensure the selected media type matches the installed paper.
Incorrect settings frequently cause poor fusing performance.
Step 6: Inspect Paper Path Components
Check:
- Separation claws
- Exit rollers
- Exit sensors
- Duplex entrance guides
Mechanical faults may lead to jams or paper damage.
Common Technician Mistakes
Replacing the Fuser Before Checking Media Settings
Incorrect paper type selection can produce symptoms similar to a faulty fuser.
Always verify paper settings first.
Misdiagnosing Transfer Problems as Fusing Problems
If toner never fully transfers to the paper, inspect the transfer system.
If toner transfers correctly but can be rubbed off afterward, inspect the Fusing Unit.
Touching Hot Components Immediately After Printing
The fuser remains extremely hot after operation.
Allow adequate cooling time before servicing.
Ignoring Thermistor Contamination
Toner buildup on the thermistor can cause inaccurate temperature readings, leading to under-fusing or overheating.
Clean or replace the thermistor as specified in the service manual.
Preventive Maintenance
To maximize fuser life:
- Use genuine Konica Minolta toner.
- Select the correct paper type for every print job.
- Remove paper jams carefully.
- Inspect rollers during preventive maintenance.
- Keep thermistors clean.
- Replace worn separation claws when necessary.
- Replace the Fusing Unit at the maintenance interval specified for the model.
Typical Fusing Symptoms
| Print Symptom | Likely Cause |
|---|---|
| Toner rubs off | Low fusing temperature |
| Toner offset | Excessive temperature or damaged roller |
| Wrinkled paper | Pressure roller or paper path problem |
| Uneven gloss | Temperature or pressure variation |
| Fuser paper jams | Separation or exit mechanism fault |
| Repeating roller marks | Damaged fusing or pressure roller |
Why Understanding the Fusing Unit Matters
The Fusing Unit is the final stage of the Konica Minolta bizhub imaging process and is responsible for converting a fragile electrostatically held toner image into a permanent print. Because successful fusing depends on the correct balance of heat, pressure, paper speed, and media settings, faults within the fuser can easily be mistaken for transfer or development problems.
By understanding how the heated fusing element, pressure roller, temperature-control system, and safety devices work together, Konica Minolta service technicians can accurately diagnose toner adhesion issues, paper handling faults, and fuser-related error conditions while minimizing unnecessary component replacement.
Conclusion
The Konica Minolta bizhub Fusing Unit permanently bonds toner to paper by applying precisely controlled heat and pressure after the image has been transferred from the Intermediate Transfer Belt (ITB). Working together, the heated fusing roller or belt, pressure roller, temperature-control system, thermistor, thermal fuse, and paper transport components ensure that every printed page leaves the machine with durable toner adhesion, consistent image quality, and reliable paper handling.
A thorough understanding of the Fusing Unit enables Konica Minolta field technicians to distinguish fusing faults from transfer and development issues, diagnose print-quality defects efficiently, and maintain the dependable performance expected from modern bizhub multifunction systems.