The imaging process is the core operation of every Konica Minolta bizhub photocopier. It is the sequence of electrical, optical, mechanical, and thermal processes that transforms a digital document into a high-quality printed page.
Whether you are printing a document from a computer, making a copy, or scanning and printing from memory, the imaging process follows the same fundamental principles of electrophotography. Each stage depends on the successful completion of the previous one. If any stage fails, image quality suffers.
For service technicians, understanding the complete imaging process is one of the most valuable troubleshooting skills. It allows you to identify exactly where an image defect occurs and avoid replacing unnecessary parts.
What Is the Imaging Process?
The imaging process is the complete sequence of operations that creates a toner image and transfers it permanently onto paper.
In a color Konica Minolta bizhub machine, the process is performed simultaneously for four colors:
- Cyan (C)
- Magenta (M)
- Yellow (Y)
- Black (K)
Each color has its own imaging station, but all four stations work together to produce a full-color image.
The Nine Stages of the Imaging Process
The complete imaging process consists of nine stages:
- Drum Preparation
- Drum Charging
- Laser Exposure
- Toner Development
- Primary Transfer
- Secondary Transfer
- Fusing
- Cleaning
- Drum Reset
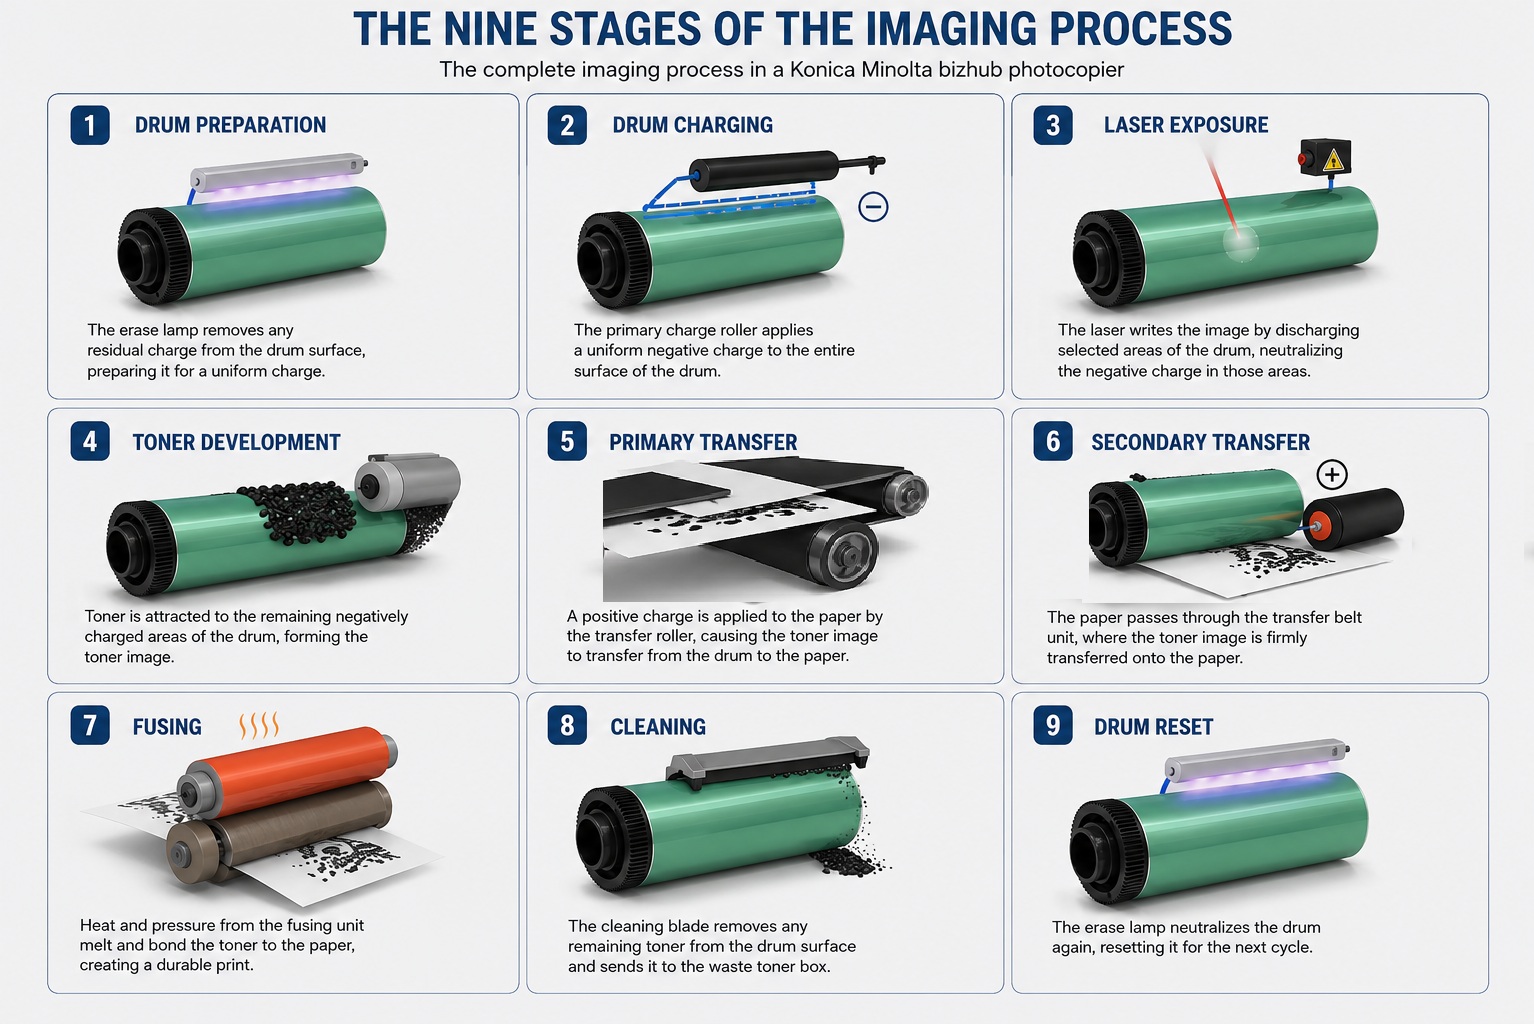
Each stage is explained below.
Stage 1: Drum Preparation
Before a new image can be created, the machine prepares the OPC drum.
This preparation includes:
- Removing residual toner from the previous print.
- Neutralizing any remaining electrical charge.
- Returning the drum to a clean, neutral state.
Main Components
- Drum Cleaning Blade
- Waste Toner System
- Primary Charge Roller (modern models)
- Erase Lamp (older models)
Without proper preparation, remnants of previous images may appear on future prints.
Stage 2: Drum Charging
Once the drum is clean, the Primary Charge Roller applies a uniform electrostatic charge across the entire drum surface.
The High Voltage Power Supply precisely controls this charging voltage.
The drum now becomes a blank electrical canvas.
Main Components
- OPC Drum
- Primary Charge Roller
- High Voltage Power Supply
Possible Defects
- Gray background
- Uneven density
- Ghost images
- Vertical streaks
Stage 3: Laser Exposure
The Laser Exposure Unit receives digital image data from the controller.
The laser scans the charged drum using a high-speed rotating polygon mirror.
Wherever the laser strikes, the drum’s electrical potential changes.
The result is an invisible electrostatic latent image.
Main Components
- Laser Diode
- Polygon Mirror
- BD Sensor
- Optical Mirrors
- F-Theta Lens
Possible Defects
- Missing image
- White vertical lines
- Blurred print
- Image distortion
Stage 4: Toner Development
The Developing Unit converts the invisible latent image into a visible toner image.
Inside the developing unit:
- Toner mixes with developer material.
- Toner becomes electrically charged.
- The Developing Roller carries toner to the drum.
Only the laser-exposed areas attract toner.
Main Components
- Developing Unit
- Developer Material
- Toner
- Developing Roller
- Doctor Blade
- TCR Sensor
Possible Defects
- Light prints
- Background toner
- Color imbalance
- Toner scatter
Stage 5: Primary Transfer
Each drum transfers its toner image to the Intermediate Transfer Belt (ITB).
The transfer sequence is:
- Yellow
- Magenta
- Cyan
- Black
The ITB now carries the complete full-color image.
Main Components
- OPC Drum
- Primary Transfer Roller
- Intermediate Transfer Belt
Possible Defects
- Missing one color
- Poor transfer
- Color contamination
Stage 6: Secondary Transfer
The paper arrives at the transfer nip exactly as the complete image reaches the Intermediate Transfer Belt.
The Secondary Transfer Roller applies:
- High-voltage electrical bias
- Mechanical pressure
The complete toner image transfers from the belt to the paper.
Main Components
- Intermediate Transfer Belt
- Secondary Transfer Roller
- High Voltage Power Supply
Possible Defects
- Hollow text
- Weak image density
- Color smearing
- White patches
Stage 7: Fusing
At this stage, the toner is only resting on the paper surface.
The paper passes through the fusing unit.
Heat melts the toner while pressure bonds it permanently into the paper fibers.
Main Components
- Fusing Roller or Belt
- Pressure Roller
- Heater Lamp
- Thermistor
- Thermostat
Possible Defects
- Toner rubbing off
- Wrinkled paper
- Offset toner
- Fuser jams
Stage 8: Cleaning
Residual toner remains on:
- OPC Drums
- Intermediate Transfer Belt
Cleaning blades remove this toner.
Waste toner travels through augers into the waste toner bottle.
Main Components
- Drum Cleaning Blade
- ITB Cleaning Blade
- Waste Toner Augers
- Waste Toner Bottle
Possible Defects
- Ghost images
- Repeating marks
- Toner contamination
- Waste toner overflow
Stage 9: Drum Reset
After cleaning, the drum still contains microscopic electrical charge patterns.
Modern Konica Minolta bizhub machines discharge the drum electronically through the Primary Charge Roller before applying a new uniform charge.
Older machines may use an erase lamp.
The drum is now ready for another print cycle.
Possible Defects
- Image carryover
- Ghost images
- Background toner
Color Imaging Process
Unlike monochrome machines, color bizhub models repeat the imaging process four times—once for each color.
Each color has its own:
- OPC Drum
- Primary Charge Roller
- Developing Unit
- Toner Cartridge
The four toner images are transferred to the Intermediate Transfer Belt in sequence and then transferred to the paper in a single secondary transfer operation.
This design provides:
- Accurate color registration
- Smooth gradients
- High-resolution color reproduction
- Stable image quality
Automatic Image Quality Control
Konica Minolta bizhub machines continuously monitor and adjust the imaging process.
Image Stabilization
Compensates for:
- Drum wear
- Developer aging
- Temperature
- Humidity
Gradation Adjustment
Prints internal test patterns and adjusts image density for smooth tonal reproduction.
Color Registration Adjustment
Measures registration marks on the Intermediate Transfer Belt and corrects alignment between Cyan, Magenta, Yellow, and Black.
Toner Concentration Control (TCR)
Maintains the correct toner-to-developer ratio by automatically adding toner when required.
Imaging Components Working Together
The imaging process depends on several systems operating in perfect synchronization.
| System | Primary Function |
|---|---|
| Controller Board | Processes print data and controls the imaging sequence |
| Laser Exposure Unit | Creates the electrostatic latent image |
| OPC Drum | Receives the latent image and carries toner |
| Primary Charge Roller | Applies a uniform electrical charge to the drum |
| Developing Unit | Applies toner to the latent image |
| Intermediate Transfer Belt | Combines the four color images |
| Secondary Transfer Roller | Transfers the complete image to paper |
| Fusing Unit | Permanently bonds toner to paper |
| Cleaning System | Removes residual toner and prepares components for reuse |
Common Imaging Process Problems
| Symptom | Most Likely Stage |
|---|---|
| Gray background | Charging or Development |
| White vertical line | Laser Exposure |
| Missing one color | Development or Primary Transfer |
| Color misregistration | Intermediate Transfer Belt or Color Registration |
| Light print | Charging, Development, or Secondary Transfer |
| Toner rubbing off | Fusing |
| Repeating marks | Drum or Cleaning |
| Ghost images | Cleaning or Drum Reset |
| Hollow characters | Secondary Transfer |
| Toner scatter | Development or Cleaning |
Diagnostic Approach for Technicians
A systematic approach helps isolate the faulty stage:
- Identify the symptom. Determine whether the defect affects one color or all colors and whether it repeats at regular intervals.
- Print internal test pages. This helps distinguish engine problems from scanner or driver issues.
- Trace the image path. Decide whether the defect appears during charging, exposure, development, transfer, or fusing.
- Inspect related components. Examine the drum, Primary Charge Roller, Developing Unit, Intermediate Transfer Belt, transfer rollers, and fusing unit based on the suspected stage.
- Use Service Mode. Check error codes, TCR values, image stabilization data, and color registration adjustments.
- Perform corrective procedures. Run Image Stabilization, Gradation Adjustment, or Color Registration Adjustment when recommended by the service manual.
- Replace components only after confirmation. Many print defects have similar symptoms, so avoid replacing parts without verifying the root cause.
Preventive Maintenance Tips
Regular maintenance helps keep the imaging system operating reliably.
- Replace OPC drums, developer material, and transfer components at the recommended service intervals.
- Use genuine Konica Minolta toner and developer designed for the specific model.
- Clean laser windows, Primary Charge Rollers, and electrical contacts during scheduled maintenance.
- Inspect the Intermediate Transfer Belt and cleaning blades for wear or contamination.
- Empty or replace the waste toner bottle before it reaches capacity.
- Perform Image Stabilization and Gradation Adjustment after replacing imaging components, as specified in the service manual.
- Keep the machine in an environment with stable temperature and humidity to reduce image-quality fluctuations.
Why Understanding the Imaging Process Matters
Every print-quality problem originates at a specific stage of the imaging process. A faded print may result from poor charging, low toner concentration, weak transfer, or improper fusing. A color shift may stem from development, transfer, or registration rather than the toner cartridge itself.
By understanding how each stage connects to the next, technicians can diagnose faults more accurately, reduce unnecessary parts replacement, shorten repair time, and maintain consistent print quality.
Conclusion
The Konica Minolta bizhub imaging process is a precisely coordinated sequence of charging, laser exposure, toner development, image transfer, fusing, cleaning, and drum preparation. Each stage depends on the correct operation of specialized electrical, optical, and mechanical components, while automatic systems such as Image Stabilization, Gradation Adjustment, Color Registration Adjustment, and Toner Concentration Control continuously optimize print quality. A thorough understanding of the complete imaging process provides service technicians with the foundation needed to troubleshoot image defects efficiently, perform accurate repairs, and maintain reliable performance across the entire Konica Minolta bizhub product line.